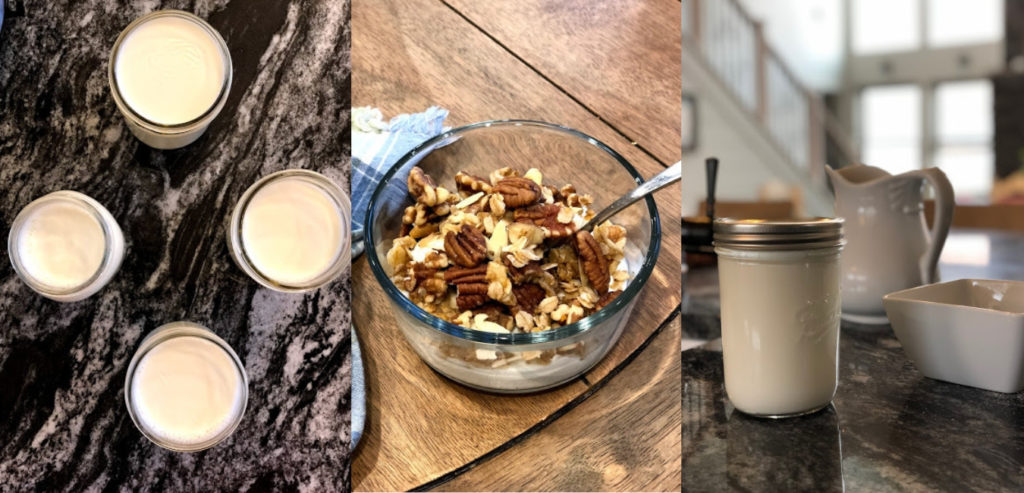
About five years ago I discovered just how simple (and cost effective) it is to make our own yogurt and I’ve been hooked ever since. By making a plain yogurt base we can add any flavors or sweeteners ourselves and avoid so much of the sugar and preservatives added to traditional store-bought yogurts. The kids’ current favorite request is to have yogurt, granola, almond butter and honey. Our favorite granola recipes of the moment are Saffron Maple Nut and Cranberry Coconut. It makes a delicious, quick, and easy breakfast or snack!
But isn’t it complicated?
No! It’s really quite easy. It takes a little bit of pre-planning to get the right timing, but I’ve found it works well to start a batch while I’m prepping dinner so that I can be near the Instant Pot during the first hour or two when you have to watch the temperature of the milk. Then I can let it ferment overnight and take the yogurt out in the morning. I’ve found my family prefers the flavor best when the yogurt has cultured for about 8 hours. It can continue to ferment longer, but will become more sour with time.
The step-by-step process
Making yogurt boils down to four simple steps.
1. Heat the milk to sterilize it (between 160-180 degrees).
2. Cool the milk to the proper incubation temperature (between 100-110 degrees).
3. Add the yogurt starter (initially you can just buy a small tub of plain, full-fat yogurt with active cultures and then after you’ve made a batch you just use a small amount of your existing yogurt as your starter).
4. Incubate at a warm temperature for 4-24 hours (again, it gets more sour the longer it ferments).
When I first started making my own yogurt I didn’t own an Instant Pot so I tried every method I could find online – incubating in a cooler with warm jugs of water, in an oven with the light on, in a crock pot, everything I could find! I had mixed success over the years and it was frustrating when a batch did not turn out. Katie Kimball from Kitchen Stewardship has a really comprehensive guide to troubleshooting yogurt that I’ve turned to more than a few times, so all was not lost!
So, how can you use an Instant Pot to make yogurt?
You can make the entire batch from start to finish in the Instant Pot with very little clean up involved (a huge win in my book)! While you can pour the milk directly in the Instant Pot and transfer to containers, I prefer to make make my yogurt in pint-sized mason jars so they are all ready to go when it’s finished. I can fit four pint-sized jars into my Instant Pot insert and that’s usually a good amount for us each week.
Homemade Yogurt in the Instant Pot
It is so easy and cost effective to make your own yogurt. Using your Instant Pot makes it even simpler!
Ingredients
- 1 cup water
- 8 cups whole milk
- 1/3 cup full-fat, plain yogurt with active cultures
Instructions
-
Add 1 cup water to the Instant Pot and insert the steamer rack. Place your glass jars on the steamer rack and fill with milk. If you are using 4 pint-sized jars like I do, you will need about 8 cups of milk. Don’t fill them all the way to the top as we will need a little room in the jar later in the process.
-
Close the lid and turn the handle to sealing. Press the steam button and adjust the time to 1 minute. This will scald the milk and get it to 180 degrees.
-
Once the steam cycle has finished let the pressure release naturally (or at least wait 10-15 minutes) before opening the Instant Pot and removing your jars of milk. Set them on the counter to cool to the proper incubation temperature (between 100-110 degrees). This process typically takes an hour or two, so I will set a milk thermometer in one of the jars and check it periodically.
-
After the jars of milk have cooled to 100-110 degrees, add a heaping tablespoon of yogurt starter to each pint-sized jar and stir to incorporate. You don’t want to add the starter if your milk is above 115 degrees as the heat will kill the good bacteria, but you also don’t want to let your milk get too cool. If it gets below 90 degrees I would heat it up gently before moving to the next step.
-
Place the jars back in the Instant Pot, close the lid and press the yogurt button. Now step back and let it do it’s work for the next 4-24 hours! The yogurt function is preset for 8 hours, but you can adjust to your family’s taste preferences. The beauty of the Instant Pot is that it maintains a consistent temperature throughout the entire incubation period.
-
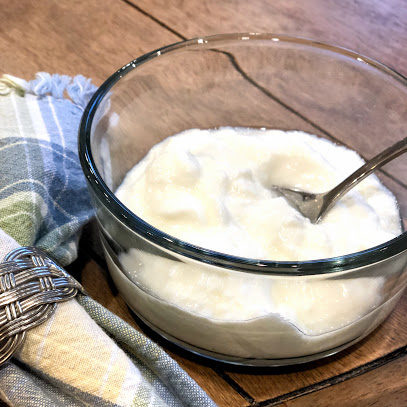
When the yogurt is finished, remove the jars from the Instant Pot and place them in the refrigerator. It’s best to allow them to cool for a few hours before consuming.


Pingback: Farm to Table Gift Guide 2021 - The Forbes Family Farm